This is the text, which I found in old sources: web.archive.org and my own archive of KGS-resources. As it is still valid, I give it here for your translation. Ruediger
similar text in German  , (already polished)
Editable Game Types
When people study go over a board in real life, there are many ways for them to start. They may start with an empty board, and set up positions to show each other; they may review a game (that one of them or somebody else played); or they may play a game against each other, making comments or examining alternatives as the game goes on. They may even comment on a game in progress while it is happening! On KGS, you can do any of these things, but you need to choose the right game type first, then you need to know how to set it up.
Introduction
Each section below covers a different type of game. If this is your first time reading this, then skim each one to learn what it can do; then, when you want to use one, read more carefully and try it out.
In all of these game types, you can try out variations, add marks (triangles, labels, etc.) to the board, and also give editing control to other players and let them try things out. More information on what you can do once you create the game is on the
editing tools help page.
Demonstration Games
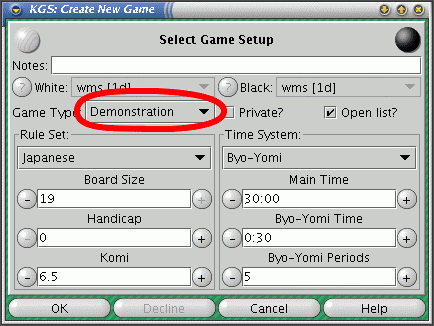 Setting up a demonstration game
A demonstration game is a game with no opponent that starts with an empty board. This is good when you want to set up positions to show to the student, or put together tsumego problems. You can save your demonstration games on KGS if you want (when you close the game you will be asked whether or not you want to), but games saved on KGS appear in your game list marked only by the date and time you created them, so it can be tricky to find the game you want later! If you want to set up a complex game then show it to students later, saving the game to your disk and uploading later (see
uploaded games below) may be better.
To create a demonstration game, press the "New Game" button in any room. Then, in the game setup window that appears, set "Game Type" to "Demonstration" (see the picture here). Set up the board size, handicap, etc. that you want; don't worry too much about the time system, the clocks don't run during a demonstration game anyway. When you are all ready, press "OK", and your game will be created. Then your students can click on the game in the room's game list to join.
Review Games
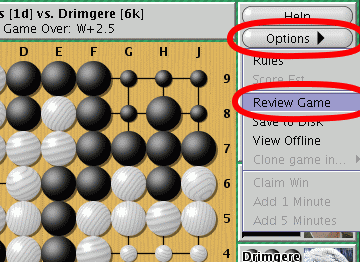 Reviewing a game you just played
A review game is like a demonstration game, but instead of starting with an empty board, you start with an actual game played on KGS. Then you can use the
editing tools to view the game, trying out variations, adding marks to make points, etc.
There are two ways to make a review game. The first is used after one of your own games has ended. Before closing the game, but
after
the game has been scored, press the "Options" button to open up a menu; then select the "Review Game" menu item (see the picture to the right). The game will the become a review game, and you will have editing control. All the features available in a demonstration game will be there for you to use, including letting students take over editing control, adding variations, etc.
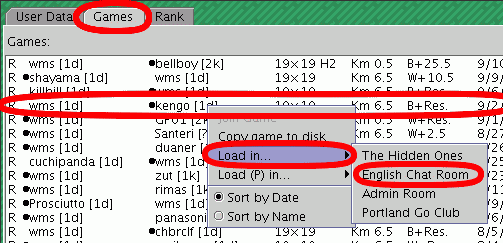 Reviewing a game from a user's game list
The second way to make a review game is to load one from a game list. This can be your own game list, or another player's; for this type of review game, it isn't necessary for you to have been one of the players! First, from the window with the rooms, go to the "User" menu and choose "View user information", then enter the name of the user whose game you want to review. This will open a window with information on the user you have selected. Click the "Games" tab in this window (see the screen shot below). From there,
right
-click on one of the games to show the popup menu; choose "Load in...", then the room you want to load the game in. Choose "Load (P) in..." to load as a private game. This will create a demonstration game preloaded with the moves from the game that you just loaded up, ready for you to review.
Uploaded Games
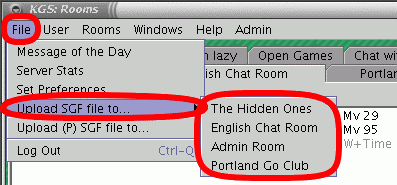 Uploading a game
In an uploaded game, you take a SGF file from your computer's disk and upload it to the server. You end up with a normal demonstration game, but it starts out with all the game data from the original SGF file. It's a lot like a review game, the only difference is that the starting setup comes from the SGF file, not from a game in KGS.
To set up an uploaded game, go to the "File" menu, then choose "Upload to..." and select a room (see the picture to the right). The uploaded game will be set up in that room. Choosing "Upload (P) to..." does the same thing, except that the game will be private.
Note:
Uploaded games, unlike the other game types, cannot be saved to KGS. So if you want to save your comments and changes to the uploaded game, make sure you choose "Save to disk" from the "Option" menu of the game before you leave it! This will save the game to your local disk.
Cloned Games
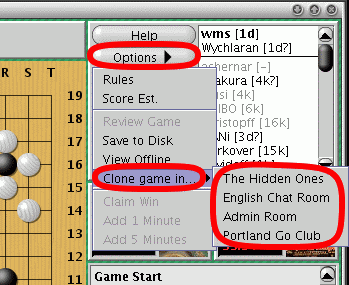 Cloning a game
A cloned game is similar to a review game, except that you are reviewing a game that is still in progress. In your clone of the game, you will start with all the moves in the game. In addition, whenever the players move in the original game, the moves will be automatically copied into your clone! This lets you show variations, add markup, discuss the game with students, etc., while the game is in progress.
To set up a cloned game, join the game you want to clone, then under the "Options" menu, choone "Clone in...", and the room that you want to clone the game into. This will create your new demonstration game.
Note:
If you ever leave the cloned game or the original game, then the cloning will stop and cannot be restarted. If this happens, just leave the original clone, go back to the game you want to copy, and start up a new clone.
Teaching Games
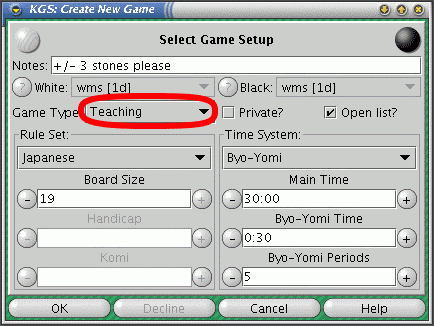 Setting up a teaching game
A teaching game is different from the other types of games we discussed so far, because in it you can actually play a normal game. There are some controls in the editing tools menu that will let you switch between playing as a normal game, and reviewing like a demonstration game.
To set up a teaching game, use the normal game setup system by pressing the "New game" button in a room. Then make sure that the "Game Type" is set to "Teaching" (see the picture). Wait for your student to challenge you, then once the game is set up as you wish, accept the challenge.
Make sure that you are playing as white, and that your student is playing as black!
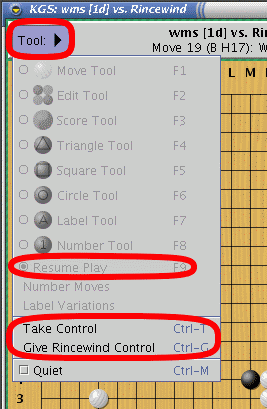 Switching between editing and playing
Once you start playing, it will be like a normal game, except that the editing tools menu is available. At any time, you can open the tool menu, and choose "Take Control" (see the picture). When you do this, the game switches to a demonstration game, and you can try out variations, go back and review past moves, or even give editing control to somebody else. When you want to play some more, just open the tool menu again and choose "Give opponent Control". This will resume play from wherever you are. So you can back up and resume play, or even edit the board and continue from there! It is up to you.
Note that in the picture to the right, all of the editing tools have been disabled (they are grey); that is because the game is in "play mode", so you cannot edit. Once the teacher clicks "Take Control", the editing tools will all become enabled, and the teacher can use them. If "Give Rincewind Control" were chosen (Rincewind is the student in this game), then Rincewind's editing controls would become enabled.
Once you were ready to resume play, the teacher must take control, then press the "Resume Play" option (also shown in the diagram to the right). This will disable all the editing tools again, and return to normal play, using the current board as a starting point.
Edit this page (requires admin or translator privilege)


